Whoorl Turns 10!

streamers

Could it be? Why, yes. This here blog is turning 10 years old. (Feel free to read my first post. Simply riveting.)

Now, in my opinion, blog years are something like dog years, except 1 year of blog life equals 4 years of human life. So, according to my deft calculations, I HAVE BEEN BLOGGING MY ENTIRE LIFE. And quite frankly, it seems like that. I mean, apparently my main goal in life in 2005 was to drink wine and discuss music…that was until I found out I was pregnant with this little guy.

(Wito! We love you, absent-minded professor! Do you remember this little ditty? Well, that precious little thing now wears the same shoe size AS HIS MOTHER. Hold me closer, Tony Danza.)

((And don’t get me started on Wita. The performance art genes are strong with this one.))

10 years. Many of you have seen me through it all – the pregnancies, new motherhood, travels, many moves, house renovations, a little phenomenon by the name of Hair Thursday, in sickness and in health…wait, are we getting married?

I just want to say thank you for being a friend. Traveled down the road and back again. Your heart is true…you’re a pal and a confidante. AND IF YOU THREW A PARTAY…AND INVITED EVERYONE YOU KNEWWWWWWW, YOU WOULD SEE THE BIGGEST GIFT WOULD BE FROM ME AND THE CARD ATTACHED WOULD SAY THANK YOU BEING FOR A FRIEEENNNNND.

Peace be with you.

Oh! In honor of this milestone, Whoorl got a little facelift from my friends at Cooperhouse. I’m swooning a little bit, isn’t it pretty? Oh, and 10 years of content isn’t the easiest to manage, but if you rollover the categories at the top, you can witness my OCD in full effect. (You know I secretly enjoyed organizing all 1,564 posts, right?)

Being the information addict I am, and according to the official statistics, here are the top 6 Whoorl posts over the past 10 years.

(more…)

Your Favorite Things From Summer – Hair Edition

Your Favorite Things From Summer - Hair Edition

Ever wonder what products mentioned on this blog are the most popular? One of my favorite things about blogging is doing a deep dive into my analytics at the end of each month to see what’s resonating with you, and I thought I might share with you all going forward!

I love to see what you all are buying and loving each month so I combed through this summer’s hits and bestsellers and these are the products at the top of the heap.

Stick around this week because I’ll also be featuring your favorite items from this summer in the clothing, beauty, home, and fitness categories!

Your Favorite Things From This Summer – Hair Edition

Summer 2020 Bestsellers

Innersense Whipped Cream Texturizer

Winner winner, chicken dinner. I love this texturizer, you love this texturizer, we ALL LOVE THIS TEXTURIZER.

T3 Convertible Base and Cascading Waves Attachment

This convertible base and this attachment create those loose, lived-waves that I love. You can check out my full tutorial here!

Cleo + Coco Dry Shampoo

It took me 10 years to find a dry shampoo that I loved, but this one is it! Love the Basil Mint scent.

EVOLVh WonderBalm Magic for Curls

The EVOLVh balms are great for not just curly/wavy girls, but anyone who wants smooth, frizz-free hair. WonderBalm is the bomb. Yes. Yes, I just went there.

EVOLVh SuperCurl Defining Balm

Now, if you ask me, the real dream team is mixing this with the WonderBalm. Shiny, smooth, frizz-free magic. I’m curious if you all did the same after purchasing?

Reverie Milk

Reverie Milk is what I consider the perfect leave-in conditioner with styling perks and the smell is divine!

P.S. – Your summer favorites: home and wellness edition is coming tomorrow!

Embracing My Natural Hair Texture

Embracing My Natural Hair Texture

Well, it took 45 years and an international pandemic to make me embrace my natural hair texture, but here we are!

I’ve spent the past few months learning to work with my natural texture instead of working against it and it’s quite liberating (and time-saving!) if I do say so myself. This post will detail my updated step-by-step hair routine (which has changed a fair amount), including tips on how to create the waves you want – even on natural, air-dried hair.

Interested in all of my favorite hair products and tools? You can find my list here!

(more…)

My Natural Hair Care Routine

You can find my updated 2021 hair routine here!

Finding a natural hair care routine wasn’t quite as easy as replacing my cosmetics and skincare with green alternatives. Being a slave to Oribe for years, I was pretty sure there wasn’t a ghost of a chance I’d be able to get that same hold and shine from natural products. I mean, I all too well remember the days of searching the local natural store’s personal care aisle, grabbing a random product and whispering a prayer to the hair gods. Make this one THE ONE…

I think we all know how 90% of those purchases turned out. Thumbs down, my friends.

However, after years of trial and error, I have found some incredible natural hair products that perform as well (if not even better) than conventional hair products and I’m here to share all of those with you today. And I’m not stopping there – I’m including my favorite styling tools, as well as a step-by-step video explanation of how I style my hair.

Let’s get down to business!

(more…)

hair thursday makeover 52

This week’s participant is Kat.

Kat is one of Hair Thursday’s biggest supporters – she leaves positive, insightful comments all of the time and I just love having her around in general.

Now, as you can see from the above photos, Kat has beautiful hair. For God’s sake, look at that perfect ponytail.

Oh, and don’t forget the shine.

Sickening, really.

Kat’s hair grows super fast and is super straight and she is SUPER BORED. She even put up a poll at her own blog to help her make a decision. Long or short? Natural or highlights? Bangs or no bangs?

Here are my two cents. I’m willing to put money on the fact that people would kill for Kat’s shiny, straight thickness. However, I know she is bored and wants a change. My suggestion to Kat would be to keep her hair color as natural as possible – no matter what kind of color she uses, nothing is shinier than virgin hair. Amen to that. If Kat continues to highlight, I would not suggest going any lighter than the highlights in the above photos. I DO think they look very pretty, so if that’s what Kat needs to feel like she’s making a change, by all means, go for it.

As for a style, I don’t think Kat should discount the idea of bangs. Looking at the above photo, it seems her bangs are cut a little too wispy for her hair type. If she tries bangs again, I would suggest heavier ones. (By “heavier”, I mean I don’t want to see the forehead through the bangs. Also, do I detect a cowlick? If so, the heavier bangs will help with that.)

Here are some examples of heavier bangs.

Some of these bangs are cut on an angle, some are straight across, but they all are heavier than Kat’s previous bangs. I definitely think that is the key.

(Kat, since your hair grows super fast, I would recommend going with a blunt, straight-across bang first and as they grow, have your stylist shape them into an angled, sideswept look. That way, you get the best of both worlds.)

Take a look at these options.

If Kat decides against the bangs, I like Option #1 for her hairstyle. The layers around the face add some movement and texture, which could help add some dimension to Kat’s straight hair. Kat would definitely need a pomade or wax to help separate and “flick” the ends. (Maybe even use a flat iron to create some loose waves? By the way, I’m working on that video tutorial and it should be up next week, if I can stop vomiting over the sound of my voice.)

Option #2 has the same kind of beachy, separated look but with bangs.

Of course, both of these styles will look great in Kat’s natural straight state, but I thought the addition of some waves would be a nice departure.

So what do you all think? Should Kat cut bangs to change it up?

hair thursday makeover 20

The Retro Glamour Edition!

The lovely May wrote me months ago expressing her love for this hairstyle.

pincurls.jpg

From her email:

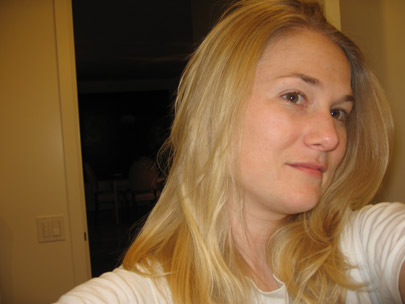
“I don’t think my hair needs drastic cutting. But for the life of me, I have no idea how to get it to do what I want. Right now I do nothing to it. It’s naturally blond, it’s fine but there’s a lot of it, and it’s stick straight.

Can you suggest something that won’t make me lose much length but will help me look red-carpet fabulous? I need product recommendations and help. I’ve always wanted to look like a movie star of yore, sort of celluloid glamorous.”

May’s hair:
may1.jpg

I must admit, I became overly excited at the prospect of such a style for May. To me, she just emulates that old school look. (Red lips! Be sure to wear the perfect red lipstick!) So, I did a lot of research – finding ways to get the pin curl/finger wave look without the all of the hassle.

First off, I found this link, which lured me into the greatest time suck continuum of my life. Oh my god, I could look at these hairstyles all day. Roller sets? Photo tutorials of rolls? Get out of here! (I’ve also been catching up on the first season of Mad Men, which is just fueling this 50’s obsession I’ve got going on.)

That website is just chock full of tutorials on how to get the retro glamour look, but let’s be frank, those hairstyles take a LOT of time and effort. Right?

Well, then I came across this link, which described a more modern take. But to me, that photo doesn’t have the detailed wave pattern in the front that really completes the look.

So, I’m going to recommend mixing the two tutorials and meeting in the middle. This should achieve May’s desired look without actually placing pin curls all over her head and taking 1,200 hours.

WWWD (what Whoorl would do) for pin curls/finger waves/50’s hair:

1. Wash and towel dry hair.

2. Apply a setting lotion or wave enhancer all over. I recommend Frederic Fekkai Wave Creating Spray, it works really well on damp hair and smells great. (I use it with the curling iron.)

3. Going from ear to ear (up and around the head), section off the front 1-2 inches of hair and twist in a clip.

4. Blow dry the remaining hair while brushing with a GOOD boar bristle brush (to close the cuticle).

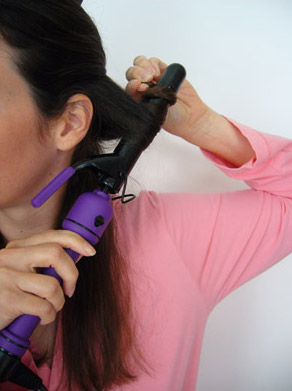
5. Curl the dried hair with a 1 to 1 1/2-inch ceramic curling iron, wrapping the hair around the barrel like so:
h99.jpg

6. Continue curling. Voila, three-quarters of your hair is done. Now, loosely pull the curled hair into a band to get it out of the way.

7. Now, we’re going to finger wave the front to give that specific retro look. Pull the front hair out of the clip, making sure it is barely damp – not too wet, not too dry. The old-fashioned way is detailed here (ohmygodwhat?) OR you can buy some hair clamps at the local beauty supply store, and place those clamps horizontally like this or this and allow the hair to dry/set OR (this one is the easiest, fastest and of course, most expensive!) buy one of these.

Any of these options will work, depending on how much time you are willing to spend. (Me? If this were a hairstyle I was planning to create multiple times, I would buy the triple-barreled iron. Only special occasions? I would use the clamps.)

If you go with the three-barreled iron route, start towards the top of the hair, and work your way down, starting where the previous curl ends in order to keep the waves symmetrical. In fact, if you buy the curling iron, you can use it for the entire head of hair. (Thus rendering my detailed, step-by-step instructions completely useless. Am crying.)

Okay, then! Am I forgetting anything? What about you sessy ladies? Do you have any tips for May regarding a retro look? Do tell!