Thanksgiving Menu and Stalking Plans

We’re not traveling this Thanksgiving, so I will be entirely in charge of this Thursday’s menu preparation. The grocery shopping has been completed, my Wednesday Prep Schedule is hanging on the refrigerator and I seriously can’t wait for a full day of cocktails, grub and football. I’ll be serving:

Turkey/Gravy – This will be handled by the lovely folks at Whole Foods. I just really don’t see the point in cooking one for the 3 of us.

Great-Grandmother’s Stuffing/Dressing – You know the drill. Tell you, have to kill you, so on and so forth…

Hash Brown Casserole – the ULTIMATE in comfort/unhealthy food.

1 lb frozen hash browns
1/2 cup chopped onions
Salt and pepper to taste
1/2 cup sour cream
1 can mushroom soup
1/2 lb. shredded cheddar cheese
1/4 cup butter, melted (1/2 stick)

Mix all together, put in casserole dish, bake at 350 degrees for one hour. Enjoy the clogged arteries.

Spanish Green Beans

Dinner Rolls/Biscuits – haven’t decided on which recipe exactly. Any good ones?

Pumpkin Bread Pudding with Whiskey Whipped Cream

1 8 ounce baguette, sliced into ½ inch slices
4 eggs
1 quart half and half
1 15 ounce can pumpkin (NOT pumpkin pie filling)
1 cup packed brown sugar
2 teaspoons cinnamon
¼ teaspoon ground ginger
¼ teaspoon ground nutmeg
1 teaspoon vanilla extract
¼ teaspoon coarse salt
cooking spray
1 cup heavy cream, very cold
2 to 3 tablespoons sugar
2 tablespoons whiskey

Preheat oven to 300 degrees.

1. Toast the bread on a rimmed baking sheet until lightly browned, turning occasionally, about 20 minutes.

2. In a large bowl combine eggs, half and half, pumpkin, brown sugar, spices, vanilla, and salt. Add toasted bread slices, cover with plastic wrap, pressing down. Place a plate that fits inside bowl on the plastic wrap and weight with a canned good. The bread must be completely submerged. Let soak until the bread is saturated about 30 minutes.

3. Transfer to a 2 quart baking dish that has been coated with non stick cooking spray. Bake for 60 to 70 minutes
until set and a toothpick inserted near the center comes out clean. Store, covered in refrigerator.

4. To make whiskey whipped cream, combine heavy cream, sugar and whiskey. Mix immediately on high speed with mixer for about 4 minutes, until fluffy. Spoon over bread pudding.

Of course, I will be cooking all of this food while sipping on a spicy Bloody Mary with pickles, olives and celery. Mmmm.

What are you making for Thanksgiving? More importantly, are you trying out any special cocktail recipes?

**************************************

I saw Twilight on Sunday night with my good friend Lisa. This might not seem like a huge deal to most of you snazzy moviegoers, but let me tell you a little something about myself. In the past 8 years, I have seen 3 movies* in the theater. (For those of you keeping track, that would be since Y2K. Y2K, PEOPLE.) I simply do not see movies in the theater, mainly because my husband has some sort of bizarre movie-induced narcolepsy, and let’s face it, it’s no fun watching a movie while your +1 is dozing. ALSO, it’s no fun when someone sitting behind you sneezes half-chewed Twizzlers in your hair. Just sayin’.

Before seeing Twilight, I didn’t think my obsession with Edward Cullen could grow. I was wrong.

I am seeing the movie again this weekend. With my good friend Lisa.

(GOOD GOD, WHAT IS WRONG WITH US.)

On a related note, anyone interested in stalking Robert Pattinson with me? My lovely cousins are providing the crazy stalker van, so we’re all set to go.

*The Royal Tenenbaums, The Squid and the Whale, Charlie and the Chocolate Factory

Updates – Part Eight

You might remember a certain shiny-haired minx named Darcey, who was the latest inductee into The Fishing Club.

When Darcey and I were emailing back and forth, I mentioned how much I loved her photo with bangs and hoped she would take my advice and dive back into bang territory. Lucky for me, she just emailed with a new photo of her absolutely fantastic bangs. (Not to mention a new dark auburn shade with a few coppery highlights.)

Take a look for yourself!

Gorgeous. Gorgeous. Gorgeous.

Color me cheap

Emily is 32 and lives in Boston with her funny boyfriend. She is a beauty school dropout who cannot stop cutting her own hair. She can be found obsessing about cheese and her cat at Pretty Crabby or talking about products endlessly at Tallulah Blue. She has not seen her real hair color since 1990.
When I was 15, I started using Sun In. That was all it took for me to become hooked on the cheap and easy hair dye in a box. Ever since I have been buying and trying every kind of dye you can get at CVS, Target, and the like. I have never had my hair dyed professionally. While I can easily justify spending $200 on a new handbag, it is really hard for me to spend that much on my head. I am not sure why this is. Maybe because it doesn’t last the same way a new leather bag does. After six weeks your hair has grown out and faded, but man, that bag is still so pretty.

In the 18 or so years that I have been dying my hair, I have found a few favorite dyes and now I am here to share them with you! You can learn from the times when my hair was so bleached out it was blue (true story) or when the brown decided not to hang around and it all ended up sort of orange and… splotchy. Please, learn from my mistakes. Your hair will thank you.

My favorites:

Garnier Nutrisse Hair Color – Sometimes I stray and use one of the below but I always find myself coming back to Garnier. It’s so easy and it has this Fruit Oil Concentrate capsule which you add to the dye and it all smells really good (mainly because the smell of the oil is covering the smell that most dyes have, ammonia). This is the one I used most recently, a brown which is not brassy or reddish (I try to stay away from red undertones because I am so fair and I can end up looking like an orange). I wish this one came with more conditioner though, it has a little packet so you have about enough for one use.

Cost: Between $6 and $7 Degree of Difficulty: Easy to Medium, three tubes to mix together. But nothing very tricky about it.

Loreal Feria – This dye claims it has “multi faceted shimmering color”! I don’t really know what that means (well, yes, I do. It’s like wearing sequins on your head, am I right?) but the color sure looks nice! I have found this one to last a long time and it also has a nice amount of conditioner which lasts for a few shampoos. I like Feria for when I go blonde in the summer, it is not as flat as some of the other blonds I’ve tried. I think because as well as taking the color out of your hair (bleaching it) it deposits a few different colors back on top – creating the afore mentioned “multi faceted” whosee whatsit.

Cost: About $10  Degree of Difficulty: Easy (Just two tubes to mix together, and then put on your head Voila!)

Loreal Couleur Experte – This is another one I use a fair amount. I also turned my mother on to this and she does it herself at home. This is the one you have seen in commercials and magazines with that freakish looking silver wand. (Seriously, does my hair dye also need to resemble a sex toy? Probably not.) That silver wand is one of the three tools you get to add highlights to your hair. First step is dying your whole head with the main color and then the second step is highlights.

The thing about the highlights is that they give you way too much of the lighter color. You should do what my mom does and mix it all together and then throw AT LEAST half of it away. No one (except perhaps Christina Agulara) needs so many highlights. The second tip I will give you is do the highlights SPARINGLY. Put much less than you think you need on your hair. I would suggest doing four small pieces of hair (evenly spaced along your part, or all towards the front) then rinsing the dye out and if you feel like  need more you can do more. Once you do too much, you cannot go back. Better to do less and add more later, the bleach will not go bad. You can even put it in Tupperware and put it in the fridge and go back and do some more tomorrow. At the worst, it will just seem like you spent a day at the beach. My what gorgeous highlights you have!

Cost: $15 – $20 Degree of Difficulty: Medium (Due to the tools, mixing and steps. But you can do it. Really. You can!)

Good luck! Your wallet will thank you and so will your head.

Links Galore

1. I’m writing a weekly column that I really, really, REALLY love. The fine folks at Brita have started the Filter For Good challenge, which has already eliminated over 100 million plastic water bottles to date. (You should take the pledge yourself!)

Along with 5 other bloggers, I will be posting once a week (on Thursdays…what is up with me and Thursdays?) with simple ways to become more environmentally-friendly in your own home. (Kind of like this post I wrote here.) I’ve added a widget in my sidebar with my most recent posts. You should check it out, you know, if you give a rat’s ass about helping our planet. NO PRESSURE, MWHAHAAAAAA.

2. Today’s post at The Working Closet has some damn cute coats, if you are interested in a fine piece of outerwear. Personally, it has been 90 degrees here, so I’m hoping this post is equivalent to some sort of internet rain dance. (They say the high is 68 degrees today…I’m not buying it.)

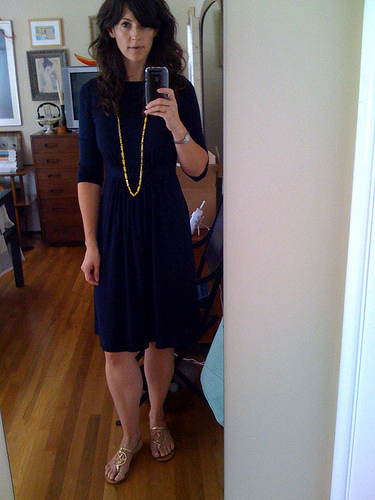
Also, why haven’t you joined the Working Closet Flickr Pool? I want to know what you are wearing to work, people! For research, of course! Ahem. It doesn’t have to be some fancy setup, for crying out loud, I take mine in a mirror with my iPhone.

2908540018_7ddc01ab70.jpg

HI-TECH. (Please ignore the hair. This was a couple of hours before a much-needed cut.)

C’mon, if you can’t eradicate plastic water bottles from your life, you can at least take a photo of what you are wearing. I need some inspiration. DO IT FOR YOUR COUNTRY.

Féria Party!

Something about the change of season makes me very antsy regarding the state of my hair. Suddenly, I want to dye it auburn or cut bolder bangs or chop it off in a sleek bob. However, with many experimental hair phases under my belt, I’ve come to the (sometimes VERY painful) realization what does and does not work for me.

In the defense of subtlety, sometimes a small color change can make the biggest difference when you are experiencing the hair blahs.

Two of my good friends recently shook off their doldrums with Féria’s new and improved home haircolor by L’Oreal. You know how some home haircolor brands have the tendency to look a little, um, FLAT? Well, Féria’s color spectrum delivers incredible color and triple highlights, plus a new built-in conditioning technology. Which means sayonara to flat color and hello to awesome, shimmering hair. (You can see all of the shades here.)

So, Holly and Andrea joined me for a little Féria party. Not only did these beauties get the chance to try out Féria’s new and improved haircolor, but they also got to dabble in a fair amount of L’Oreal makeup.

(Lucky bastards.)

Let’s take a look at Holly’s before photo.

Clearly, a GORGEOUS girl. (I’m pretty sure Holly could color her hair chartreuse and still look breathtaking.) Holly chose Féria #45 (Deep Bronzed Brown) and got down to business.

How ANYONE could look so perfectly cute with a towel wrapped around her head, I’ll never know.

And the new Holly!

The deep bronzed color really looks gorgeous. Don’t you think? (And seriously, what is UP with the shimmer? How does that technology work and HOW can I get my hands on it?)
*insert maniacal laughter here*

Let’s not forget my stunning friend, Andrea!

Andrea really wasn’t looking for much of a color change, but was more than happy to get in on some of that Féria shimmer action. She chose #40 (Deeply Brown), and it was the perfect match for her.

Take a look.

I was pleasantly surprised at the amount of instant shine and shimmer created from the coloring process. Andrea looks fantastic.

Thanks to these lovely ladies for letting me document their coloring process! Let’s do it again soon, shall we?